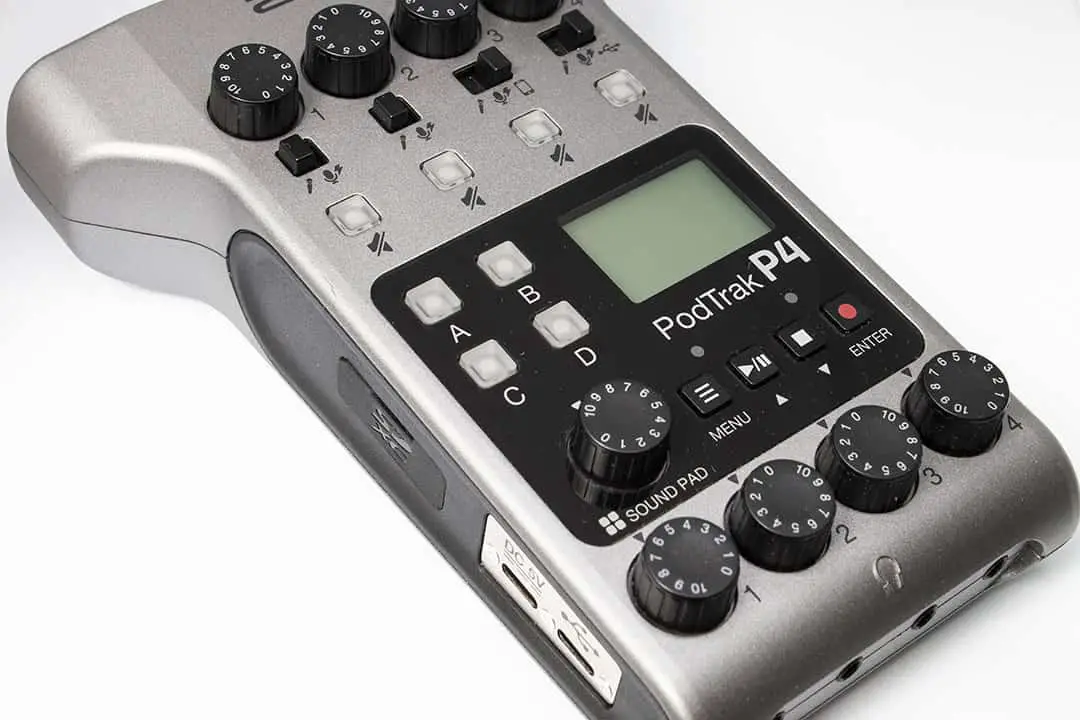
When I first saw the spec for the Zoom PodTrak P4, my initial reaction was one of great excitement. With 4 x XLR inputs and headphone outputs, in-built sound pads, and the ability to plug in and record either a phone or USB device meant that I thought all my prayers had been answered when it came to finding the ultimate podcasting tool.
As soon as I could, I placed my order and before long it arrived, ready for me to put it through a series of tests, replacing my trusty Tascam DR60Dii for the duration of the testing period and only at the end of that process would I make the decision to sell it or keep it and retire the Tascam for good.
Table of Contents
Zoom PodTrak P4 vs Tascam DR60Dii
Up until the point of buying the Zoom, the Tascam had given me years of reliable service. With decent pre-amps, a good number of options in terms of sample rate and bit depth, and flexible input and output options, it wasn’t often I was left wanting.
The biggest downside of the Tascam though was that it only had 2 x XLR inputs. This wasn’t an issue when recording my podcast with my usual co-host and a remote guest (as it also had a 1/8” jack input which recorded to channel 3-4) but when an in-person interview needed to happen, an adapter cable was required meaning that the audio from my co-host and I had to both be run into XLR channel one and in post-production, I lost the luxury of having each person’s mic on a separate track which in some scenarios can be a lifesaver.
Another frustration was that there was only one headphone socket on the Tascam meaning that it was necessary to split the signal. This did work but was less than ideal.
Although the P4 was built for podcasting, it wasn’t the phone/USB inputs or the sound pads that attracted me to it in the first place but the 4 x XLR inputs and headphone outputs.
Here’s my full list of wins for the Zoom over the Tascam, followed by my list of features where the Tascam excels.
PodTrak P4 Wins (vs the DR60Dii)
- 4 x XLR inputs
- 4 x headphone outputs
- Ability to use as a USB audio interface
- Phone input feature to record guests either on a traditional phone call or using their mobile to communicate through a video conference app such as Zoom, Skype, or Microsoft Teams (there’s also an optional accessory to connect via Bluetooth)
- Ability to record a USB device onto one of the channels
- The form factor – it’s compact and very portable
- The in-built, customizable sound pads
DR60Dii Wins (vs the PodTrak P4)
- The ability to record in higher sample rates and bit depths (the P4 is limited to 44.1 kHz at 16-bit)
- The multiple outputs which can be used for things such as connecting an external backup recorder (I use a Zoom H1 for this purpose)
- The display – although similar in quality and style to the P4, I personally found the meters easier to monitor whilst recording
- The flexibility when setting up each input device
- The mixing capabilities that aren’t possible with the P4
So, a similar number in each list, however, for the purposes of podcasting, some of the ‘pros’ on the Tascam list aren’t actually necessary so if those were to be taken out, the Zoom would be the clear winner which is why I was so keen to get my hands on one and put it to use when producing my own podcast. That leads us nicely onto my experience with it…

First Impressions
Two days after playing my order the P4 arrived. I excitedly unboxed it and as sad as it sounds, quite liked the packaging! The unit its self was in a black fabric bag that I’ve kept and put the P4 in when taking it ‘on the road’.
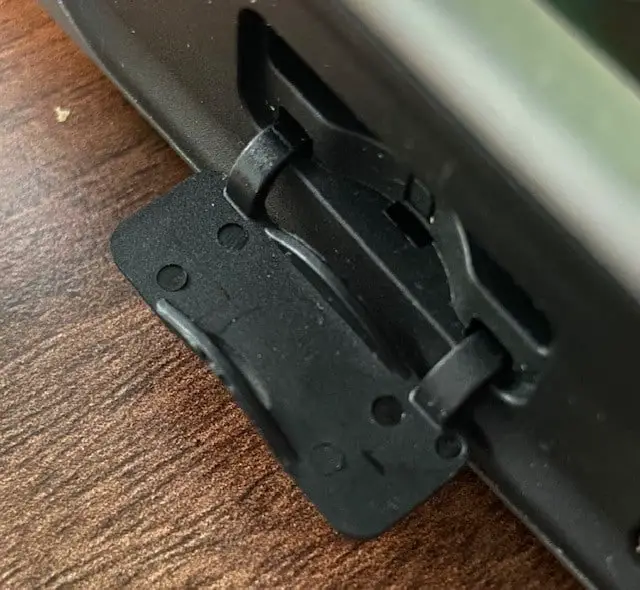
The first job was to switch it on and give it a test. I went to open the SD card door and oops, one of the plastic hinges was broken. I decided that as long as the door still opened and closed OK by relying on the remaining hinge, I’d keep the unit simply for ease. I inserted the SD card and went to close the door which is when the other hinge broke – not a good start in terms of build quality.
I contacted the retailer and arranged a return. Based on the spec, I really wanted to persevere as I knew it would solve a few problems for me and could be a very versatile unit. Because of this, I asked for a replacement as opposed to a refund.
The new unit arrived a few days later and I’m pleased to report that the SD card door hinges were intact and that’s still the case after a few months of using it regularly – phew!
Build Quality
Although that wasn’t the ideal start and made me question the build quality of the unit, as stated above the SD card door has been fine since.
The unit is made entirely of plastic. This includes all the buttons, switches, and dials. For a unit with so many features and at such a low price point, I did expect that to be the case and even though it’s all plastic, it feels fine when in use and I don’t worry about anything breaking. If you look after it when in transport and in use, it should last just fine.
Power Options
There are 3 ways of powering the Zoom Podtrak P4 – 4 x AA batteries, a USB power bank, or by plugging it into a computer via USB and using it as an audio interface.
My preferred method for when podcasting on location is the USB power bank. However, using AA batteries is a great backup option as I found out when I forgot to take the USB cable needed to power it with a power bank!
The official battery life when using AA batteries is 4 hours. The 12000mAh power bank I use should give me many more hours of recording, but I’ve never left it going as a test to see how many hours I’d get but I’m confident enough that it will be more than sufficient for any podcast interview I’m likely to record.

The Menu
The menu is simple and easy to navigate. The first thing I noticed was how few options there were at the top level. When entering the menu, you’re met with the following options:
- Files
- Sound Pad
- Mic Settings
- File Transfer
- Settings
In files, you’ll see all the files currently on the SD card. In sound pad you have the option to customize the four sound pad buttons (new sounds can be added via the SD card). The mic settings allow you to apply a lo-cut filter or a (digital) limiter. File transfer is used when the device is plugged into a computer via USB instead of taking out the SD card from one and inserting it into the other.
The settings menu is the most comprehensive with options for the following:
- USB mix-minus
- Date/time
- LCD contrast
- Battery (to select battery type)
- Auto power off
- SD card (format and test)
- Factory reset
So, all in all very straight forward and a lot of the settings are set as a one-time setup job. After that, the only real reason to visit the menu is to format the SD card!
Things I Love About the Zoom PodTrak P4
The appeal of this device was the features specific to podcasting – the 4 inputs and 4 outputs, the ability to connect both a mobile phone and a USB device as an input with automatic mix-minus which is enabled by a setting in the menu. Those who have attempted a mix-minus with a mixer will appreciate this feature immensely!
I’ve recorded interviews with a co-host on Microsoft Teams, routed into the P4 via USB and a guest on the phone, routed in via the relevant 1/8” jack input on the side of the device. Having each person on a separate track provides for great flexibility in post-production. Another less obvious benefit of this, as opposed to a setup where both the remote co-host and guest are both on the same Teams/Zoom/Skype call coming in via USB, is that as one talks over the other (which inevitably happens), one tends to cut the other’s audio out which can make for jarring listening.
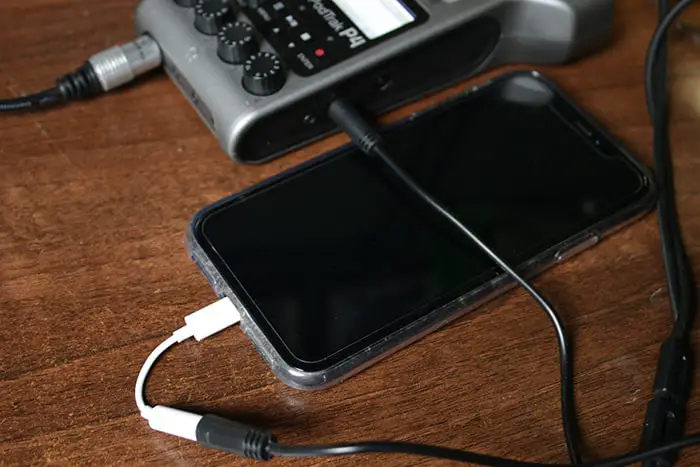
When you have them coming into the device separately, all of their audio is kept intact and you can then clean it up at the editing stage as you see fit. You may think that this is limited to one person on Zoom/Teams, etc, and one on the phone (with the phone being lower audio quality) but that doesn’t need to be the case. If the co-host or guest downloads the relevant software app to their phone, they can use that and the sound quality should match that of the other person using the desktop version of the app. Everyone will be able to hear each other and it makes for such a flexible, high quality, and easy solution to recording remote interviews.
Another feature I really like is the customizable sound pads. For my workflow, I find them largely unused but it’s still great that they’ve been included on a device at this price point as they’re a great feature for those who like to use them.
| Preview | Product | |
|---|---|---|

|
Zoom PodTrak P4 Podcast Recorder, Battery Powered, 4 Microphone Inputs, 4 Headphone Outputs, Phone... | View on Amazon |
Things I Think Could be Improved on the Zoom PodTrak P4
Although overall I’m a big fan, there are improvements which I think could be made.
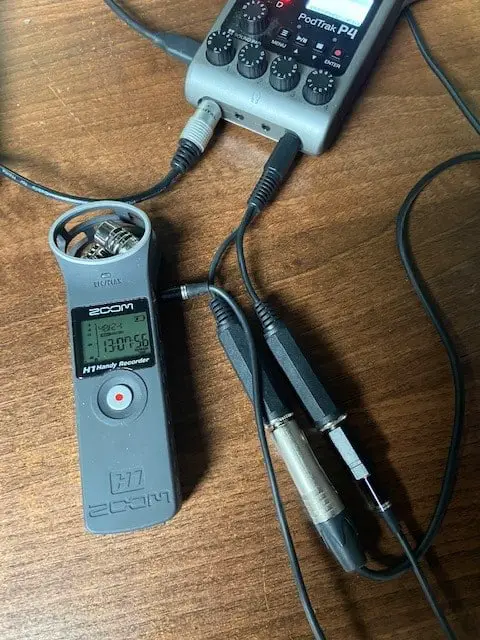
The first is that there’s no dedicated output for a backup recorder like on my old Tascam. I do like to use my Zoom H1 as a backup just in case there’s any sort of failure with my main unit or the SD card in it while recording.
If you’re only using a maximum of three of the headphone outputs this isn’t an issue as you can just use the fourth to run into the backup recorder. If you do need all four headphone outputs for actual headphones, that option disappears. However, by using the device in different ways I’ve realized that the headphone outputs are mono meaning that you can split the signal and send audio to both a set of headphones and a backup recorder as shown in the image below.
Another disappointment is the fact that the only recording quality available is 16-bit /44.1kHz. When using my old Tascam, I always recorded in 24-bit at 48kHz. I’m not sure if Zoom is able to offer more options with a firmware update but it would be very welcome if it was possible.
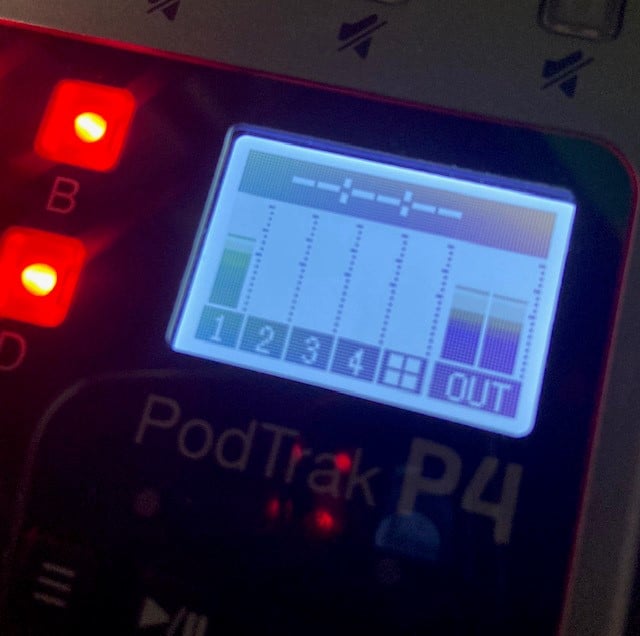
The last thing I’m not keen on is the visual level monitoring capabilities of the device. The display is small and the meters have no dB indicators on them. There’s also no visual warning when clipping is occurring. Even on my basic Zoom H1, the record light will flash when the audio starts clipping. I’ve fallen victim in the past to this lack of warning on the PodTrak P4 and only discovered some clipped audio once the recording process had finished and I was at the point of editing.
In Summary
Although not the perfect podcasting tool, I’d say it was closer to perfect than I’ve previously found, especially at that price point.
A device like the P4 which is built for podcasting from the ground up offers some great features that make using it a real pleasure – it’s super simple and lowers the barrier to entry for would-be podcasters.
Did I end up selling my Tascam DR60Dii? Yes, I did, the PodTrak P4 has become my podcasting tool of choice. There are some areas of improvement as I’ve mentioned but overall, I love it and am glad that I requested a replacement rather than a refund after I received that defective unit.
Kudos to Zoom, great job.
You can find out more about the device and get the latest price here on Amazon.