
In the past, audio recording was a practice limited to only a select few lucky enough to have the money and technical knowledge to operate expensive desks, and tape machines. However, developments in the digitization of recording technology, and the widespread availability of personal computers have made the practice readily available to hobbyists and casual consumers alike.
However, this shift to consumer markets has generated a hugely profitable, and highly competitive market for digital recording software. This leads to a plethora of available software, and with such saturation, you may be left feeling confused as to which DAW best for you.
If this is a familiar scenario then fear not, because today we will be taking a deep dive into two of the most popular DAWs on the market – to see how they compare in 2021.
Table of Contents
What is a DAW?
But what exactly is a DAW, and what does it stand for? A DAW (digital audio workstation) is software that is designed to record and edit music. This workstation should be able to see you through the recording and tracking of audio, and any subsequent post-production with a high degree of flexibility.
Therefore, a successful DAW should be able to carry out these two primary functions as efficiently as possible. Alongside carrying out these two basic tasks, an intuitive user interface is a massive bonus. Between recording episodes, and then editing and producing them, you will be spending a large amount of your time in these applications, therefore it stands to reason that your time with them should be as simple and enjoyable as possible.
While product websites will provide you with a comprehensive list of technical specifications, we will be approaching these DAWs with daily use cases in mind. We will be comparing their user interface, and both recording and editing capabilities, in this head-to-head comparison.
It is worth pointing out that both of these DAWs are available in a variety of different price brackets. To save our wallets and yours, we will be comparing two entry-level versions of each product (Cubase Elements 11, and Pro Tools First respectively).
Cubase
Up first is Steinberg’s Cubase Elements 11. This particular version boasts up to 48 audio tracks, each with 8 inserts to add your choice of the 47 built-in VST effects. These specs are impressive for under $100, but how well does the software integrate these features? Let’s find out.
User Interface
First impressions are everything, and right from the outset, it is clear that Steinberg has taken a simplistic approach to their UI – sticking to a monochrome color scheme, which is effective in helping to distinguish different sections, and checking what is currently selected. The small pops of color are reserved for recording buttons and levels, making it incredibly obvious what tracks are currently active when recording.
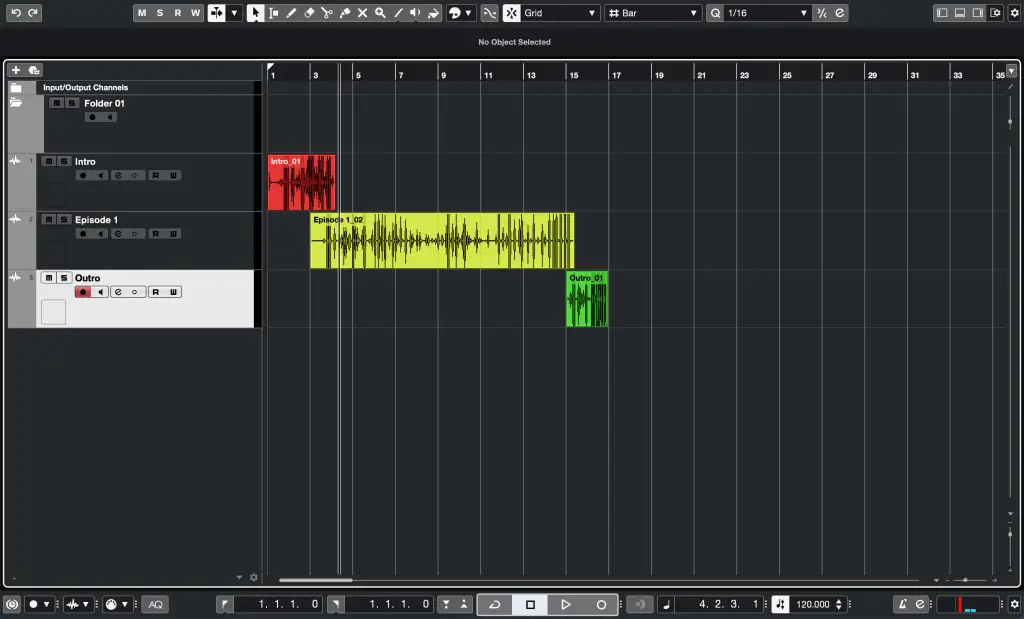
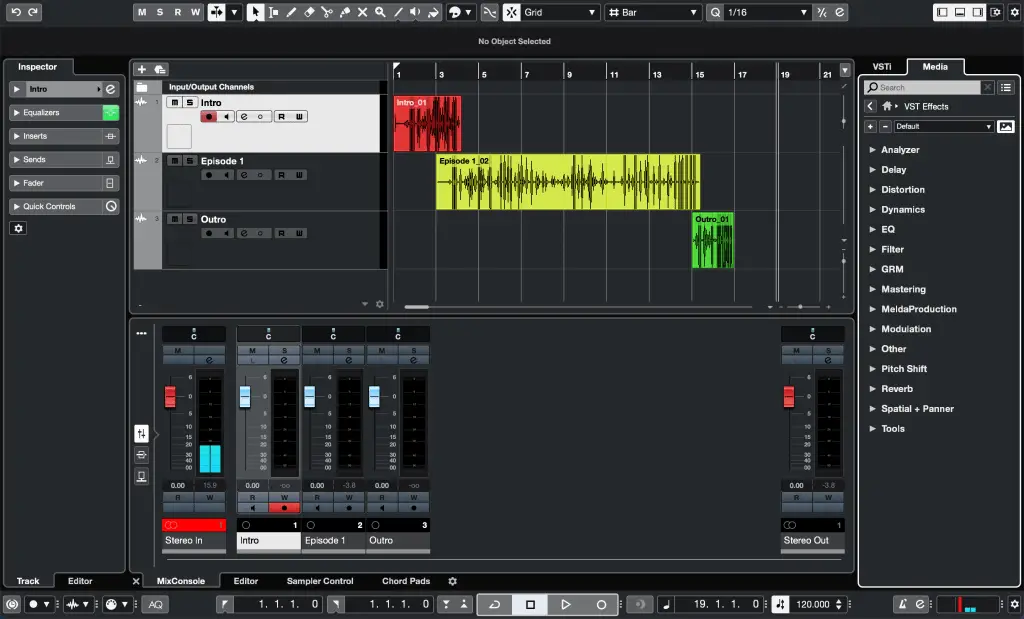
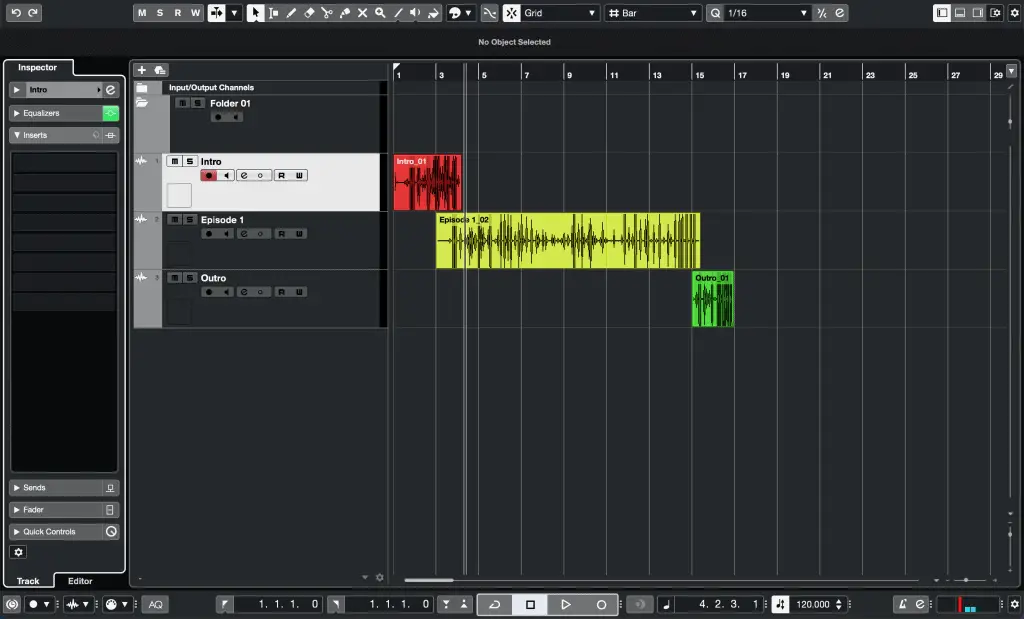
Libraries, channel information, and mixer are all hidden initially. In the top right you can activate these components which helps streamline workflow depending on your current task. This modular approach is not without its flaws, however, as there is no option for a separate mixer window like in other DAWs. This means that sections may accumulate, and begin to take up a lot of screen real estate. I found myself adjusting the height of the tab quite often when switching between tracking and leveling.
Despite this small drawback, the UI is incredibly clean and easy to understand right out of the gate. It is clear that Steinberg have taken special care in ensuring that Cubase offers a quick and easy user experience.
Recording
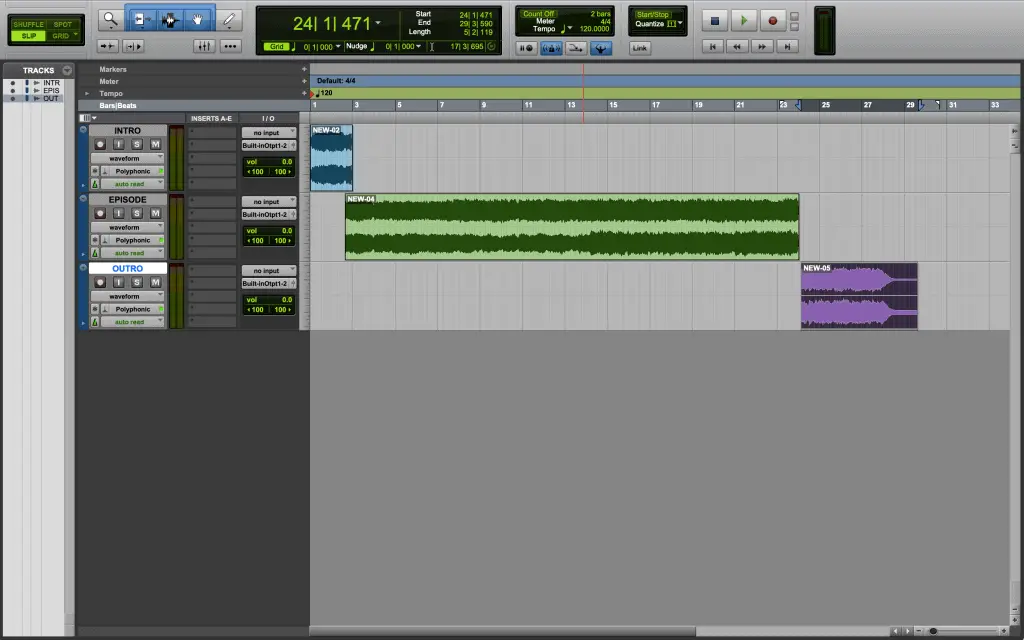
Recording into Cubase was a piece of cake. Creating a track is a case of clicking the plus button in the top left of the timeline, and naming and record enabling. I had no issue setting my preferred inputs and outputs, and as a first-time user, I found the whole process incredibly efficient.
The transport bar is located at the bottom of the software unlike other popular DAWs, however this was easy to adjust to, and clears up screen space at the top, allowing for a larger timeline to use when monitoring incoming signal.
It is worth noting that by default, tracks are displayed in black and white. While this keeps everything cohesive stylistically, a coloured track makes it much easier to identify what is currently playing. This is easily rectified using the colour fill tool at the end of the tool bar, however having tracks be auto assigned to a random colour when recording would come as a nice improvement to the recording workflow.
Editing
When it comes to editing audio, the DAW should help in getting tasks done as fast as possible. An optimized DAW helps keeps you focused on the mix and makes the process of listening to and adjusting audio parameters much faster, and more enjoyable.
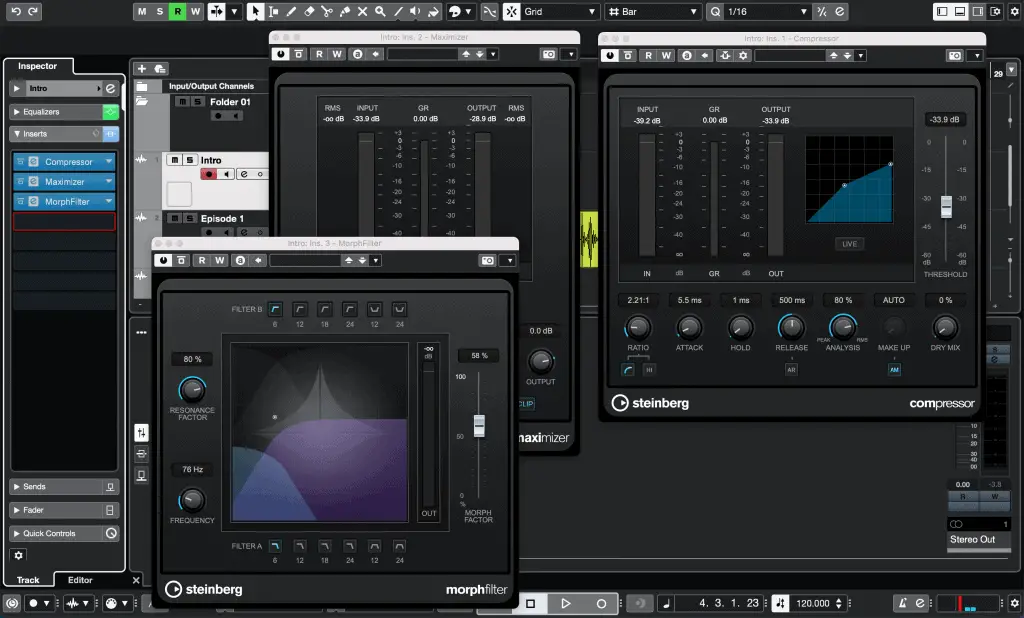
Each track has a built-in 4 band parametric EQ and visualizer on both the mixer tab and the track tab, making any changes to the frequency content a simple process. Below this is an inserts tab, in which you can insert any of the 47 built-in VST plugins, or any other third-party plugins you may wish to use.
The plugins all follow a largely monochrome theme, with interactive graphical interfaces, allowing for a high degree of correlation between audio and visual manipulation when editing. For example, the compressor lets you adjust points on the compression visualiser, allowing you to tweak the knee and threshold while perceiving the effect in real-time. These tools are incredibly easy to use and offer a very low level of entry due to their design – making Cubase a great choice for first time DAW users.
Pro Tools
The second DAW we will be looking at is AVID’s Pro Tools. Pro Tools can be found in most (if not all) studios and professional editing suites and is widely regarded as the industry standard for audio production software. This should be no surprise as the DAW has been in circulation for three decades at this point, meaning AVID has had time to tweak and refine its program with subsequent updates.
User Interface
Pro Tools takes a no-frills approach to its user interface. The color scheme hasn’t changed majorly since its initial release, and why fix what isn’t broken? Everything you need to begin recording; the tracklist, timeline, navigation bar, are all situated in a defined space on the screen, making finding the desired control incredibly easy.
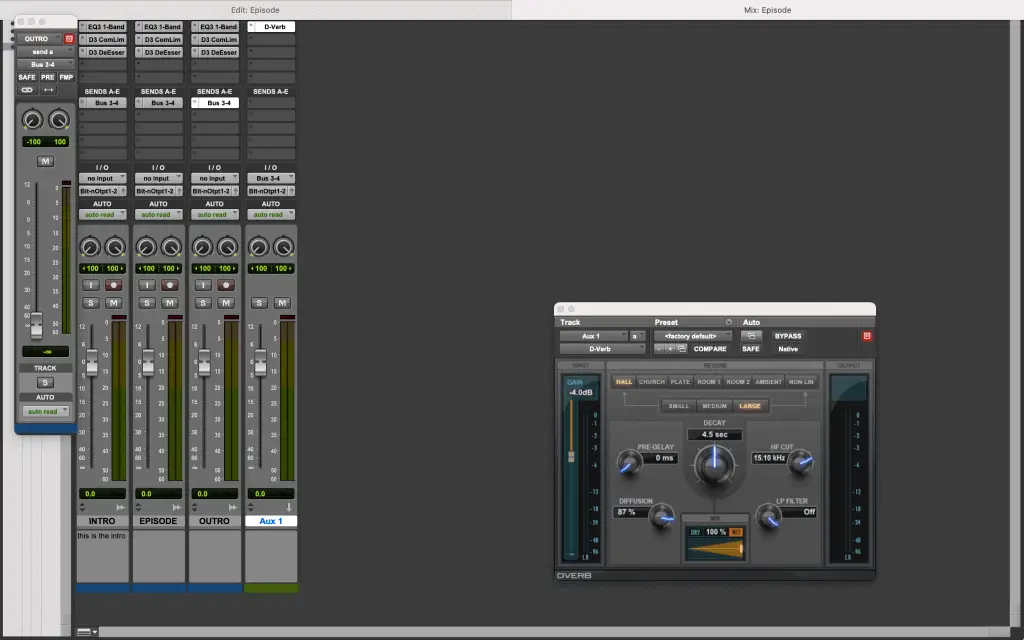
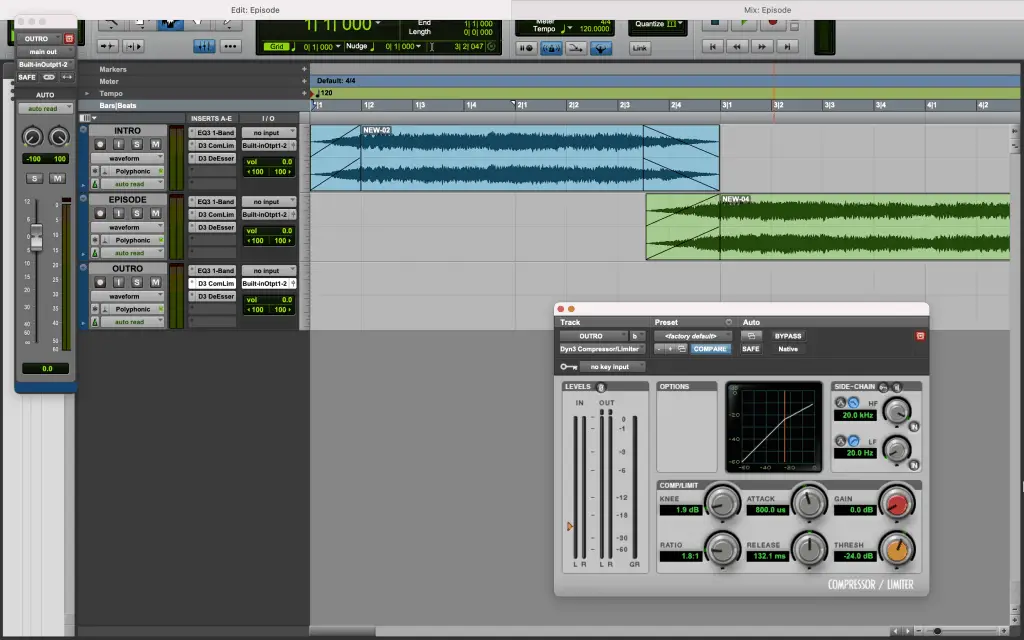
Much like Cubase, pro tools opt for a tab system, allowing you to show and hide elements to keep the UI less cluttered during the production process. Instead of one window, however – Pro Tools utilizes separate windows, including a separate window dedicated to the mixer.
This separation of multitrack recorder, and mixer helps distinguish different stages of the production process, which is a massive asset as you can focus solely on the levels and inserts without any distracting elements.
Recording
It should be no surprise that recording into Pro Tools is a simple and straightforward process. Instead of an additional track button, you simply double click to create a new track lane, and when doing so you are given the option to add a comment. This comment can be changed at any time and is a nice addition as this box can be used to note down aspects of specific takes, either for later use or for direction if sending the file off for external editing.
In order to get audio into the DAW, you must first select your desired input via the I/O section. While other DAWs attempt to anticipate your preferred input based on the ins and outs available, this extra step is necessary before hearing any audio in Pro Tools. While this may be viewed as an unnecessary step in the recording process, making a habit of picking inputs will help familiarise new users with the concept of audio routing in the box.
Editing
Due to the separate mixer and timeline windows in Pro Tools, you have a variety of ways to approach post-production.
The timeline is used for cutting, sequencing, and any other time varying manipulation. The drag to fade option is incredibly helpful as it means you don’t have to switch to the automation view to create smooth transitions, and each track is automatically assigned a separate colour, making it very apparent which track you are affecting at any time.
The mixer window has the tracks laid out vertically, with large level monitors and access to track inserts and sends. The mixer layout is ideal for adjusting EQ, compression, or setting up auxiliary sends, and the tracklist on the left-hand side makes organizing tracks a breeze.
Pro Tools VST plugins are displayed as separate windows within the application, and while this does help to keep your screen relatively clear when mixing, the software defaults to allowing only one plugin on the screen at the time. This can be bypassed by clicking the red target button on the track window; however, this seems like an unnecessary extra step that slows mixing somewhat.
Head-to-Head
So which DAW is best for you? While only you can answer ultimately answer that question, lets recap the strengths and weaknesses of both to help inform your decision.
Cubase
Pros
- Minimalistic interface, monochrome color scheme with a few colors used to indicate important parameters such as monitoring and recording.
- Additional tools stored in tabs that are togglable in the top right of the program.
- Intuitive recording process, with easy track creation, record enable, and input monitoring options.
- Simple EQ and insert options on each tab.
- 47 free VST plugins for audio processing.
- Right-click toolbar for quick swapping of functions.
Cons
- No option for separate windows which can lead to a cluttered workspace.
- Tracks default to monochrome, making them harder to differentiate between.
- Built-in EQ is limited to 4 bands maximum, meaning further adjustment requires an additional plugin.
Pro Tools
Pros
- Widely available in commercial and professional facilities, reducing the need to export stems (opting instead for transfer of the entire file and all its information).
- UI is clean and all the tools are clearly defined within their own regions on the screen.
- Togglable mixer window provides a better layout for mixing.
- Auto-colored track lanes, and an option for additional comments on each track.
Cons
- Ins must be selected to record audio (resulting in additional setup time).
- Dated UI design (in comparison to competitors).
- Default insert mode allows for only one plugin on screen at a time.
Clearly, both DAWs excel in some areas, and lack in others. Depending on your workflow, for example, the need for a full-screen mixer may make Pro Tools the obvious choice. On the other hand, if you prefer to use a more modern user interface, then it would make sense to opt for Cubase.
What is important to note is that both of these DAWs are used in professional scenarios on a regular basis. While Pro Tools certainly boasts a much wider use, many artists and podcasters use Cubase with great success. Neither is inherently better or worse than the other, with both achieving the same results. The differences lay in how the way they will get you to that finished product.
Final Thoughts
This has been a breakdown of two of the most popular digital audio workstations on the market in 2021. While our breakdown has been focused on the day-to-day user experience when recording and editing a podcast, you can find a full list of the technical details of each program on their respective websites (here for Cubase) (here for Pro Tools).
But this is just the tip of the iceberg in terms of available digital audio workstations. FL Studio, Ableton, and Logic Pro are other professional DAWs that frequently draw comparisons to both Cubase and Pro Tools. These all have their own strengths and weaknesses, so keep this in mind when deciding what to buy!
If you want to keep it cheap and go for a free DAW, but don’t know what to choose, check out our article on ‘Audacity VS Garageband for Podcasting & Voice Over’ to learn more!